
A motorcycle's temperature sensor is one of the most quietly critical components on the bike. It continuously monitors thermal conditions and feeds real-time data to the engine control unit, helping regulate fuel injection, ignition timing, and cooling fan operation. When this small but essential component is neglected, the consequences can range from poor fuel economy and rough idling to serious engine damage caused by undetected overheating. Understanding how to maintain and care for your motorcycle's temperature sensor is not just a matter of good housekeeping — it is a fundamental part of responsible motorcycle ownership.
.jpg)
Proper care of the temperature sensor extends its service life, preserves engine performance, and prevents costly diagnostic headaches down the road. Whether you ride a sport bike, a naked roadster, or a touring machine, the principles of temperature sensor maintenance remain consistent. This guide walks through the practical steps and habits that keep your temperature sensor functioning accurately across thousands of miles of riding.
Understanding the Role of the Temperature Sensor on a Motorcycle
What the Temperature Sensor Actually Monitors
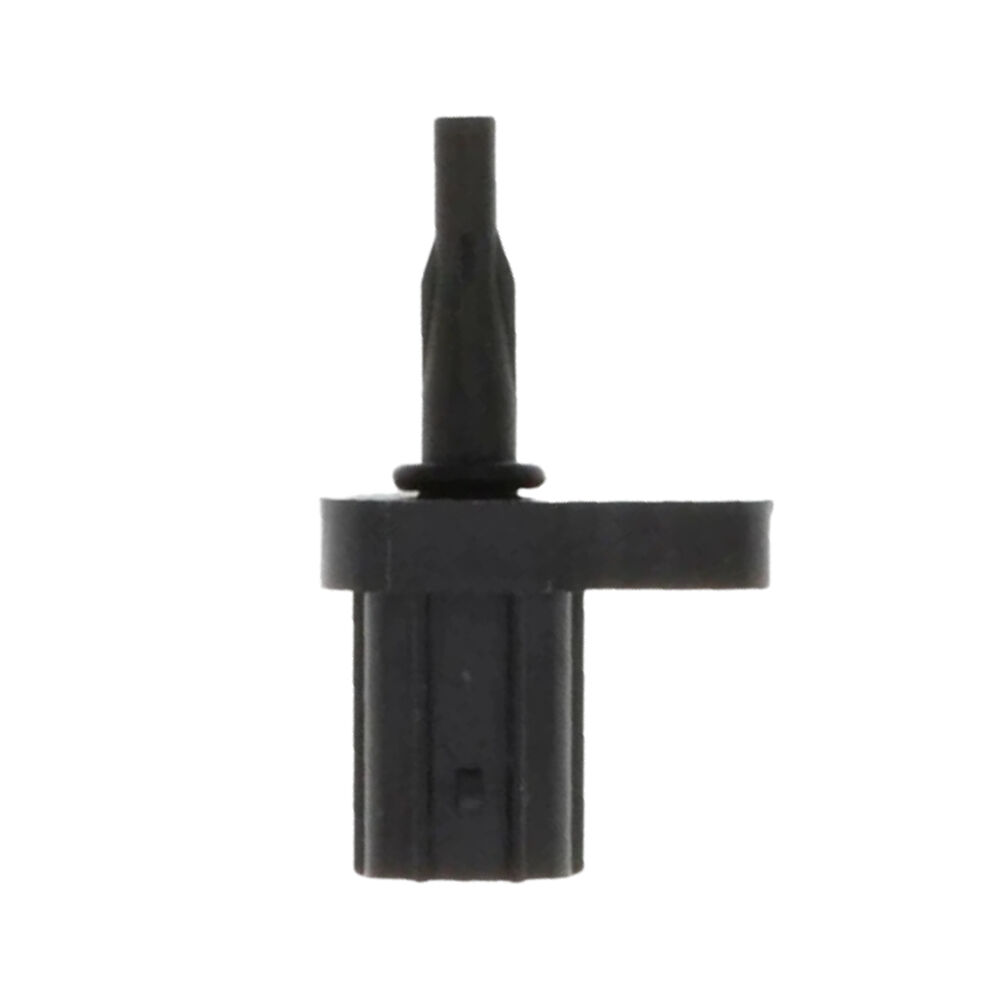
The temperature sensor on a motorcycle is designed to measure specific thermal values within the engine system. The most common types include the coolant temperature sensor, which tracks the temperature of the liquid coolant circulating through a water-cooled engine, and the air temperature sensor, which measures the temperature of intake air entering the throttle body. Both types send voltage signals to the ECU, which uses this data to make real-time adjustments to engine operation.
On air-cooled and oil-cooled engines, the temperature sensor may be positioned to monitor cylinder head temperature or oil temperature directly. Regardless of placement, the sensor's job is the same: deliver accurate thermal readings so the engine management system can respond appropriately. A temperature sensor that reads even slightly off can cause the ECU to over-fuel or under-fuel the engine, leading to performance issues that are often misdiagnosed as carburetor or injector problems.
Understanding what your specific temperature sensor monitors helps you prioritize where to focus your maintenance attention. Riders who frequently operate in extreme climates — very hot summers or cold winters — place additional stress on the temperature sensor and should inspect it more frequently than those riding in moderate conditions.
How Sensor Degradation Affects Engine Behavior
A degraded temperature sensor does not always fail outright. More often, it drifts — meaning it begins reporting values that are slightly inaccurate without triggering a fault code immediately. This gradual drift is particularly problematic because the engine continues to run, but not optimally. Fuel trims shift, combustion efficiency drops, and the rider may notice subtle symptoms like harder cold starts, increased fuel consumption, or a slight hesitation under acceleration.
In more advanced stages of degradation, the temperature sensor may produce erratic signals that cause the ECU to oscillate between fuel maps, resulting in rough running or stalling. At this point, a fault code is likely stored, and the check engine light may illuminate. Catching degradation early through routine maintenance avoids reaching this stage and keeps the engine running within its designed parameters.
Routine Inspection Practices for the Temperature Sensor
Visual Inspection of the Sensor and Its Housing
A basic visual inspection of the temperature sensor should be part of every major service interval. Begin by locating the sensor on your specific model — consult the service manual if needed, as placement varies significantly between engine configurations. Once located, examine the sensor body for cracks, corrosion, or physical damage. The sensor housing is typically made from brass or aluminum, and both materials can show signs of corrosion when exposed to moisture, road salt, or coolant leaks over time.
Pay close attention to the area where the sensor threads into the engine block or intake manifold. Thread corrosion in this area can make future removal difficult and may cause coolant or air leaks if the seal is compromised. A light application of anti-seize compound during reinstallation helps prevent this issue from developing. If you notice any discoloration, pitting, or white mineral deposits around the sensor base, these are early warning signs that deserve closer attention.
Also inspect the sensor tip — the portion that protrudes into the coolant passage or intake tract. Deposits of scale, oil residue, or carbon buildup on the sensor tip can insulate it from the medium it is measuring, causing it to read lower temperatures than are actually present. Cleaning the tip carefully with an appropriate solvent during inspection helps maintain measurement accuracy.
Checking the Electrical Connector and Wiring Harness
The electrical connector attached to the temperature sensor is a frequent source of problems that are often mistakenly attributed to the sensor itself. Disconnect the connector and inspect the terminals for corrosion, bent pins, or signs of heat damage. Corrosion on the terminals creates resistance in the circuit, which the ECU interprets as a change in sensor output — effectively mimicking a faulty temperature sensor reading without the sensor itself being defective.
Use electrical contact cleaner to clean corroded terminals, and apply a small amount of dielectric grease before reconnecting to prevent future moisture ingress. Inspect the wiring harness leading to the temperature sensor for chafing, cracking insulation, or areas where the wire may be rubbing against hot engine components. Heat-damaged wiring near the temperature sensor is a common issue on motorcycles where the harness routing was not properly secured during a previous service.
After cleaning and reconnecting, gently tug on the connector to confirm it is fully seated and locked. A loose connector can cause intermittent temperature sensor faults that are notoriously difficult to diagnose without a thorough physical inspection of the harness.
Cleaning and Protecting the Temperature Sensor
Safe Cleaning Methods for the Sensor Body
Cleaning the temperature sensor requires care to avoid damaging the sensing element. For sensors that are accessible without full removal, use a soft brush and a mild solvent to remove surface contamination from the sensor body and the surrounding area. Avoid high-pressure water jets directed at the sensor, as water intrusion into the connector or sensor body can cause immediate or delayed electrical faults.
If the temperature sensor needs to be removed for thorough cleaning, allow the engine to cool completely before attempting removal. On coolant temperature sensors, draining a portion of the coolant first prevents spillage and reduces the risk of burns. Once removed, soak the sensor tip in a mild descaling solution if mineral deposits are present, then rinse with clean water and dry thoroughly before reinstallation. Never use abrasive materials on the sensor tip, as scratching the surface can alter its thermal response characteristics.
For air temperature sensors located in the intake tract, cleaning is typically simpler. A light spray of mass airflow sensor cleaner — which is safe for sensitive electronic components — is usually sufficient to remove oil film or dust accumulation from the sensor element. Allow the sensor to dry completely before reinstalling and starting the engine.
Protective Measures to Extend Sensor Life
Prevention is more effective than repair when it comes to temperature sensor longevity. Keeping the cooling system in good condition directly protects the coolant temperature sensor. Old, degraded coolant becomes acidic and can corrode sensor threads and housings from the inside. Following the manufacturer's coolant replacement interval — typically every two years for most modern motorcycles — removes this corrosive threat and keeps the sensor operating in a clean environment.
For air temperature sensors, ensuring the air filter is clean and properly seated prevents oil mist and fine particulates from contaminating the sensor element. A clogged or improperly installed air filter allows unfiltered air to bypass the filter media, carrying abrasive particles directly past the temperature sensor and into the engine. Regular air filter maintenance is therefore a form of indirect temperature sensor protection.
Applying a thin coat of corrosion inhibitor to the exterior of the temperature sensor body — avoiding the tip and connector — provides an additional layer of protection against road salt and moisture. This is particularly valuable for riders in coastal regions or areas where roads are salted during winter months.
Testing the Temperature Sensor for Accuracy
Using a Multimeter to Verify Sensor Output
Testing the temperature sensor with a multimeter is a straightforward process that any mechanically inclined rider can perform. Most temperature sensors are negative temperature coefficient thermistors, meaning their electrical resistance decreases as temperature increases. By measuring resistance at a known temperature and comparing the result to the values specified in the service manual, you can determine whether the temperature sensor is reading accurately.
To perform this test, disconnect the sensor from the wiring harness and connect the multimeter leads to the sensor terminals. With the engine cold — ideally after sitting overnight — the resistance should be relatively high, typically in the range of several thousand ohms depending on the specific sensor. After warming the engine to operating temperature, resistance should drop significantly. If the readings fall outside the specified range at either temperature point, the temperature sensor has drifted and should be replaced.
This test is particularly useful when diagnosing intermittent symptoms that do not consistently trigger fault codes. A temperature sensor that passes a static resistance test but fails under thermal cycling — expanding and contracting with heat — may only reveal its fault during a live data test using a diagnostic scanner while the engine is running.
Interpreting Live Data from a Diagnostic Scanner
Modern motorcycles with OBD-compatible ECUs allow live sensor data to be read through a diagnostic scanner. Connecting a scanner and monitoring the temperature sensor output in real time provides a much more complete picture of sensor health than a static multimeter test alone. Watch for temperature readings that climb too slowly during warm-up, plateau at an unusually low value, or spike erratically — all of these patterns indicate a temperature sensor that is not performing correctly.
Compare the live temperature sensor reading against the actual coolant or air temperature using a separate thermometer if possible. A discrepancy of more than a few degrees Celsius between the sensor reading and the actual measured temperature confirms that the temperature sensor requires replacement. Documenting these readings over time also helps identify gradual drift before it becomes severe enough to affect engine performance noticeably.
When and How to Replace the Temperature Sensor
Recognizing the Signs That Replacement Is Needed
Knowing when to replace the temperature sensor rather than continuing to clean and test it is an important maintenance judgment. Physical damage — cracks in the housing, corroded threads that cannot be cleaned, or a bent sensor tip — always warrants immediate replacement. Electrical faults confirmed by both multimeter testing and live data analysis also indicate that the temperature sensor has reached the end of its service life.
Persistent fault codes related to the temperature sensor circuit, even after cleaning the connector and verifying wiring integrity, are a strong signal that the sensor itself is the source of the problem. Similarly, if the engine's cold-start behavior has noticeably worsened — requiring longer cranking, running rough until fully warm, or consuming more fuel than usual — and other potential causes have been ruled out, the temperature sensor is a logical next suspect.
As a general guideline, a temperature sensor that has been in service for more than five years or 50,000 kilometers should be considered for proactive replacement during a major service, even if it has not yet produced obvious symptoms. The cost of a new temperature sensor is modest compared to the diagnostic time and potential engine damage associated with a sensor that fails unexpectedly.
Best Practices for Installing a Replacement Sensor
When installing a replacement temperature sensor, always use a sensor specified for your exact motorcycle model. Sensors that appear physically similar may have different resistance curves, and installing an incompatible temperature sensor will cause the ECU to receive inaccurate data even though the sensor itself is brand new. Verify the part number against your service manual or a reliable parts reference before purchasing.
Apply a small amount of thread sealant or PTFE tape to the sensor threads if specified by the manufacturer — some coolant temperature sensors require this to prevent leaks, while others use a copper sealing washer instead. Torque the sensor to the specification listed in the service manual; overtightening can crack the sensor housing or damage the threads in the engine block, while undertightening risks leaks and poor thermal contact.
After installation, clear any stored fault codes using a diagnostic scanner, refill and bleed the cooling system if coolant was drained, and run the engine through a full warm-up cycle while monitoring the temperature sensor output. Confirm that the reading rises smoothly and reaches the expected operating temperature before declaring the replacement successful.
FAQ
How often should I inspect my motorcycle's temperature sensor?
A visual inspection of the temperature sensor and its connector should be performed at every major service interval, typically every 12,000 to 15,000 kilometers or once per year, whichever comes first. Riders who operate in harsh environments — extreme heat, cold, or high-salt conditions — should inspect the temperature sensor more frequently, ideally at every oil change service.
Can a faulty temperature sensor cause my motorcycle to overheat?
Yes, indirectly. If the temperature sensor reports a lower temperature than is actually present, the ECU may not activate the cooling fan at the correct threshold or may not enrich the fuel mixture appropriately for high-load conditions. This can allow the engine to reach dangerously high temperatures without triggering the warning systems designed to alert the rider. A temperature sensor that reads accurately is therefore an important part of the engine's thermal protection strategy.
Is it safe to ride with a temperature sensor fault code stored?
Riding with an active temperature sensor fault code is not recommended for extended periods. The ECU typically enters a limp-home or default mode when a temperature sensor fault is detected, using a fixed substitute value in place of the actual sensor reading. While this allows the motorcycle to continue running, it means the engine is no longer being managed with accurate thermal data, which can affect performance, fuel economy, and long-term engine health. Address the fault as soon as practical.
Does the type of coolant I use affect the temperature sensor?
Yes, coolant chemistry has a direct impact on temperature sensor longevity. Using the wrong coolant type — for example, mixing silicate-based and OAT-based coolants — can accelerate corrosion of the sensor housing and threads. Always use the coolant type specified by the motorcycle manufacturer, replace it at the recommended interval, and avoid topping up with plain water as a long-term solution, since diluted coolant loses its corrosion inhibitor properties and can damage the temperature sensor and other cooling system components.